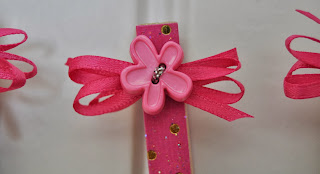
Here is my newest addition to my Etsy store:
I love these clothespins! They have so many uses! I've used them for hanging pictures, cards, baby blankets, wet dish washing gloves, and much more!
I made them by decoupaging sparkle Mod Podge onto wooden clothes pins with some pretty pink cardstock then hot gluing on the ribbon & buttons. The bows are made by hand and I tied the buttons on so they're super sturdy!
I hope you like them! Come check them out at Cutie Z Creations!
I'm always open to any suggestions on how to improve my products or shop so please feel free to let me know!
I'm always happy to make any custom orders as well; not just clothespins but pretty much anything!
Thanks for looking!
Sunday, February 2, 2014
Wednesday, January 29, 2014
Cutie Z Creations
Well, I finally did it! I opened my own Etsy store! I named it Cutie Z Creations after my cute little baby Z. Right now the shop is pretty sparse but I'm looking forward to making it grow. I'm very excited to say that I've already sold a mobile!
Now I'm looking to my friends and family to help my shop gain some strength so if there is anything at all you want made I will make it for you at a very big discount to get myself more established.
Some ideas of what I can make are: Mobiles, Cards, Invitations, Jewelry, Personalized Metal Stamping, Ornaments, Banners, Party Favors, Fairy Dust, and pretty much anything else you can think of!
I have also decided to change my Blog to promote my Etsy store. Not much will change, It'll be all my crafts but the blog name will be different, that's all!
Here's my store; come take a look!
Tuesday, January 14, 2014
Omedeto Banner
I know it's shocking, but here's another craft I put together for my bro's wedding party!
This is an Omedeto Banner, which, I believe, means Congratulations in Japanese:
I used the Ribbons & Rosettes Cricut cartridge for the background rosettes, the Nate's ABCs cartridge for the lettering, and the Pagoda cartridge for the flowers.
Here's a close-up of an "O":
There was lots of folding & gluing involved but I think it turned out quite pretty.
Labels:
Banner,
Japanese,
Nate's ABCs,
Pagoda,
Ribbons & Rosettes,
Wedding
Monday, January 13, 2014
Pagoda Card Holder
Here is the Pagoda Card Holder I decorated for my brother's wedding party on display with some of my Favor Boxes:
Here's what the original looked like on the box (the original didn't have the flowers on it):
I did some serious cutting out and Mod Podging:
I put together the flowers using these from the Pagoda Cricut cartridge:
Here's how they turned out:
My final creation!
It took a lot of Mod Podge and time but I think it looked great!
Friday, January 10, 2014
Wedding Party Favor Boxes
I made 100 of these bad boys for my super cute new sister-in-law Elizabeth and my handsome bro Kenny for their wedding party.
They got married in Hawaii (jealous!!!) so we threw them a wedding party before they left.
Here's the couple newly married! Love them!!!
Here's how the favor boxes started:
100 pieces of "Far East" scrap-booking paper! I guess it's important to mention they had a Japanese themed party.
I used the Tags, Bags, Boxes & More 2 cartridge to cut out the boxes (I had 10 Cricut mats going!):
I used the Pagoda cartridge to cut out the Kanji in black Vinyl; the Kanji means "love" in Japanese, then I added my "Made By Candice" stamp.
Here's the wording I printed out on transparent paper then used the Baby Steps cartridge to cut out the shape:
I used the Create A Sticker machine on the wording to attach it to the boxes; I went through a lot of those!
I did the same for the "thank you" tags but used the Pagoda cartridge for the tag shape:
On one side it says "thank you" in English and on the other in Japanese:
Here they are! 100 favor boxes!
This was by far the most I've ever made of one thing; it was a lot of work but I had a good time and Kenny & Elizabeth are worth it!
Special thanks to my lovely sister-in-law Camille for helping me stuff them with Japanese candy & adding the "thank you" tags!
Thursday, January 9, 2014
Thanksgiving Banner
Again, a little late but here's the Thanksgiving banner I made, it's actually currently still on the wall. :p
Here's the banner in its entirety:
A bit close on the letters:
For this banner I used the Stretch Your Imagination cartridge for the turkeys and leafs, and used the Cricut Alphabet for the letters. It's hung up by twine and I attached the leafs using clothes line clips. I Mod Podged paper onto the clips to make them cute then hot glued the buttons on after tying raffia on the buttons.
Here's one of the turkeys:
A close up of the buttons on the turkey:
The eyes are buttons with black bling jewels glued on top.
It was fun making something a little different and nice to finally have some Thanksgiving decorations!
Monday, December 2, 2013
Happy Halloween Banner
It's a little late but I wanted to show off the Halloween banner I made this year. It's currently hung up in my craft room until I figure out a good way to store it till next year.
Here's the whole banner:
I made the banner using the Pretty Pennants, Flower Shop & Kate's ABCs cartridges.
Here's a close up of some letters:
I used a coat or two of extreme glitter Mod Podge to give it some sparkle.
A close up of the flower:
The flowers were a lot of work but I thought they turned out quite nice, obviously I used sparkly buttons for the center. Can you tell I like me some glitter... :)
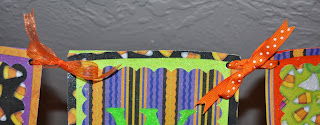
I held the banner together by putting in black eyelets then tying them together with ribbon. I thought the eyelets might make it a bit more sturdy but I think it makes it looked rather nice too.
Now back to work making party favors for my soon to be sister-in-law's bridal shower! Those posts will come eventually... Lots of work but lots of fun!
Labels:
Banner,
Flower Shop,
Halloween,
Kate's ABCs,
Pretty Pennants
Subscribe to:
Posts (Atom)


.JPG)


